Do you struggle with messy data in Excel, such as when full names are crammed into a single cell? In this tutorial, I’ll provide solutions for splitting first and last names into separate columns, boosting your data management efficiency. Learn quick methods to clean up your spreadsheets and make analysis much easier. (Includes downloadable practice file.)
Knowledge You’ll Gain
- Understand Excel’s Name Splitting Options: Learn to easily separate first and last names in Excel.
- Unlock the Power of Excel Functions: Discover the formulas (“LEFT”, “RIGHT”, “FIND”, “LEN”, and more) to handle outliers.
- Easy-to-Follow, Step-by-Step Guides: Our clear examples make learning name splitting in Excel easier.
- Become more organized: See how splitting names into parts opens more functionality.
Too Much Data in a Column?
Let’s face it, creating spreadsheets or lists is easy without considering how the data will be used. However, I’ve seen a few examples where too much data was in one column and needed to be split or parsed. Here are some common examples:
- Addresses
- Birthdays
- Phone numbers
You’d probably be better off splitting the data into different columns in each example above. Regarding addresses, I’d probably want to break things down into discreet entities like street, city, state, country, and so on. I found when dealing with voter files having a separate field for street numbers helped with creating canvas maps.
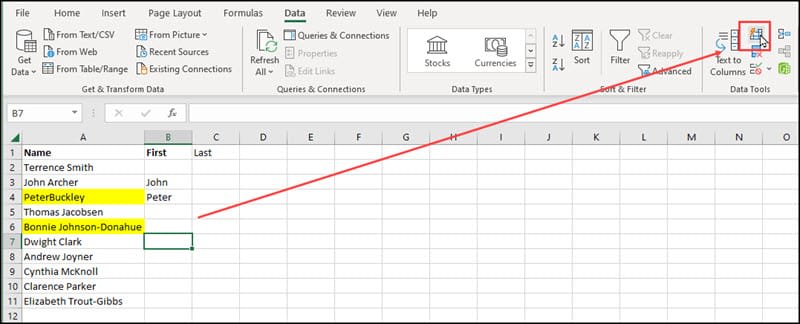
The key to solving this problem is to parse or split text based on pattern matching or Excel substrings. The typical separators or delimiters include tabs, semicolons, commas, hyphens, and spaces. For example, if you go to the Data tab, you’ll see a Text to Columns item. Unfortunately, it seems people dismiss this choice because their data is already in columns.
How to Split First and Last Name in Excel (Wizard)
This solution is the easiest, provided your names are uniform. In other words, you don’t have a middle name or initials. Instead, the key relies on finding a delimiter, such as a space character which triggers the split. We can use Excel’s Convert Text to Columns Wizard in this case.
- Right-click the column header to the right of the names you wish to split and select Insert. For example, if your names are in Column A, click Column B. This new blank is where we will put the Last Name.
- Click the column header of the column you wish to split. In my example, the names are in Column A.
- From the Data tab, select Text to Columns. A data wizard appears.
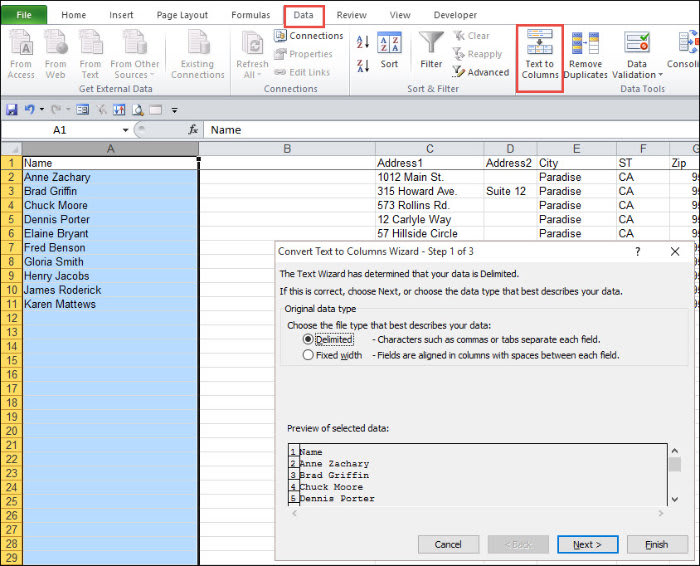
- Choose the Delimited radio button in the Original data type section.
- Click Next.
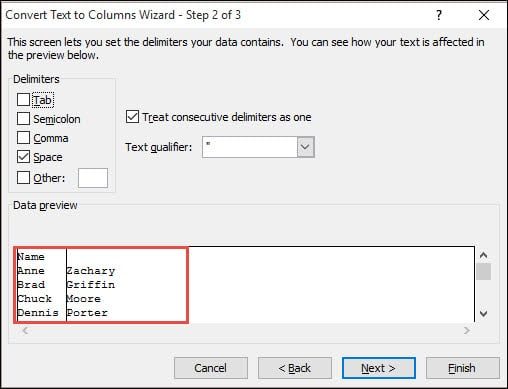
- In the Delimiters section, select the item that separates your data. In my example, a space separates the First and Last names.
- Look at the Data preview section. If the data looks correct, click Next.
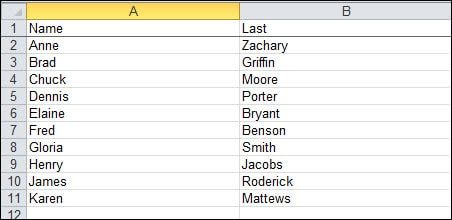
- Click the first column in the Data preview section and select the Column data format type. I’ve kept the default Destination range.

- Click Finish.
- Label your new column.
How to Separate Names in Excel with Flash Fill Feature
Another easy way to separate cell contents is with flash fill. I did a previous tutorial on using Flash Fill in Excel so I won’t go into depth here. It offers easy parsing steps where you have consistency. This solution doesn’t require formulas or delimiter options but pattern matching.
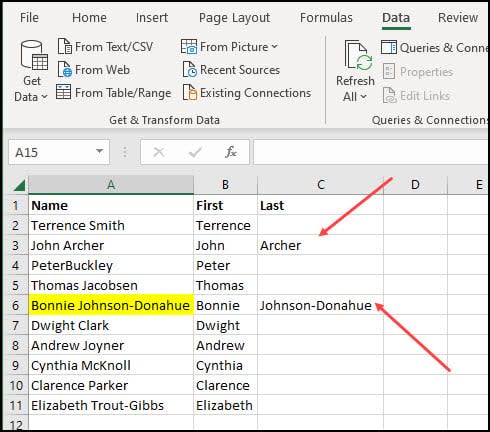
It’s best used with the First name and Last name columns. The feature doesn’t rely on formulas or the Text to Columns widget. It does depend on pattern recognition, but you don’t have to define the pattern. It can also be more forgiving than the wizard. For example, in the screen snap below, you’ll see A4 is a name that doesn’t have a space between the First and Last Name. And A6 uses a hyphen in the Last Name.
Flash Fill’s idea is to train Excel with a couple of example entries. Then, based on your entries, Excel will try to fill in the remaining entries. Sometimes, you don’t need to press the Flash Fill item on the Data menu. It reminds me of Excel custom lists, except you don’t have to define them.
After I provide my examples in B3 and B4, I can hit the Flash Fill button or use the Ctrl + E keyboard shortcut. Excel will fill in the First name column. We can then train Flash Fill for Last names. I’ve prefilled C3 with a value and C6 containing a hyphenated last name.
As you’ve probably guessed, it will get tripped up on suffixes. Sorry, Jr.
TextExpander: Worth It? Find Out.
Is TextExpander the right tool to boost your productivity? Get an independent assessment, weigh the pros and cons, and make an informed decision. Find out why I’m a fan.
Read the ReviewHandling Middle Names or Initials
Not long after I solved my friend’s problem, he called to tell me my solution no longer worked. After asking several questions, some people put in their middle name or initials. I reminded him the earlier solution gave him his needed “first name.” He then told me he used the “last name” or surname field. So, having the middle part messed things up for him, and the Text to Columns wizard wasn’t the best solution.
A better solution would be to use formulas that work like the wizard in that we search the cell for spaces. The goal was to get something like the example below.
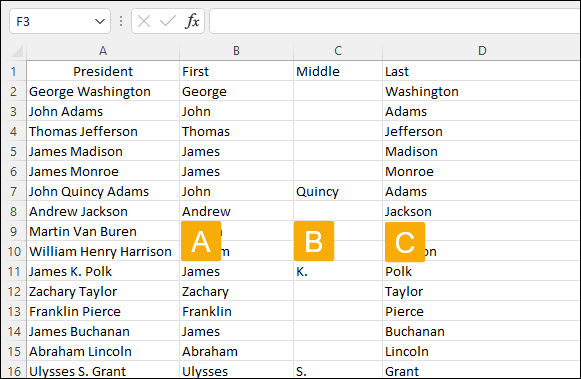
Searching LEFT for the First Name
One difference in using an Excel formula is that I keep the initial Name (President) field untouched. So, to get at the First name, I’ll use a formula to search within the President cell contents using LEFT.
- Insert a new column called First to the right of your Name column. In my example, this is column B.
- In cell B2, enter:
=LEFT(A2,SEARCH(" ", A2) -1))
- Grab the sizing handle in the lower-right corner and drag it down to copy the formula to other cells.
In this example, I’m searching for the first instance of a space in cell reference A2. Once it’s found, I move left and grab the contents. This works well unless someone with no spaces, like Cher, signs up for my friend’s newsletter.
Finding the Middle Name
I’ll admit I thought this part would be easier. Unfortunately, I don’t have the perfect formula to extract the middle name. Yes, even US Presidents can be outliers. That’s a fancy way of saying it’s not perfect and didn’t handle Martin Van Buren. The formula parsed the name but made his last name Buren. So I’m putting you on notice; you must review your results.
You’ll also notice that I’ve used IFERROR in the formula. While it’s not necessary, I wouldn’t say I liked seeing all the #VALUE cell entries for people who didn’t have a middle name. So, by using IFERROR, I can substitute a space ” ” instead.
- Insert a new column called Middle. In my example, this will be column C.
- In cell C2, enter:
=IFERROR(MID(A2,SEARCH(" ",A2,1)+1,SEARCH(" ",A2,SEARCH(" ",A2,1)+1)-SEARCH(" ",A2,1)), " ")
- Grab the sizing handle in the lower right corner of cell C2 and drag it down to copy the formula.
Parsing the Last Name
Usually, last names can also be handled by a formula. In this case, I used the formula mentioned by ExcelChamps.
- Insert a new column called Last or Surname.
- Type the formula:
=TRIM(RIGHT(SUBSTITUTE(A2," ",REPT(" ",LEN(A2))),LEN(A2)))
- Grab the sizing handle in the lower right corner of cell D2 and drag it down to copy the formula.
Oddball Cases & Add-In Solution
Your names list may still have oddball cases where you might want to use a commercial Microsoft Excel add-in like the AbleBits tool, which is part of their Ultimate Suite if you’ve got a lot of outliers. I’m unsure if it can handle surnames like Van Buren or Van Gogh, but it can help you with suffixes and prefixes.
Key Points & Takeaways
- There are multiple ways to have Excel separate full names, including the Columns Wizard, Excel formulas, and Flash Fill.
- Too much data in one field can present problems such as restricting personalization and sorting/filtering issues.
- The Convert Text to Columns Wizard is an easy solution if your names are uniform.
- Another easy way to split names is with Flash Fill. This solution doesn’t require formulas or delimiter options but pattern matching. It’s best used with the First name and Last name columns.
- If the names include middle names or initials, Excel formulas can be used to separate them.
Example Names Worksheet with Formulas
One of the things that I realized is that as careful as I think I am in entering formulas, mistakes still happen. For example, I was getting an error in the worksheet referenced below. One of my fields had a trailing space. I’ve also been guilty of dropping the closing ) on some formulas. The good news is the Excel sample file of US Presidents has the parsed names and formulas.