Do you find yourself sending out the same letter to a large group of people? You might be able to send your message more efficiently by using Microsoft Word’s mail merge feature. In this mail merge tutorial, I’ll show you how to use Microsoft Excel with Microsoft Word to create personalized letters. (Updated for Microsoft 365).
What is Mail Merge
If you’re unfamiliar with the term “mail merge,” it refers to combining data from one or more sources to create new items. For example, you could combine elements from a contact list with a letter template to make personalized letters. And you can use the same merge steps to create printable gift certificates. Likewise, you can use a similar process to make custom address labels.
Understanding the Mail Merge Process
It helps me to think of the mail merge process in terms of three files.
- Mail merge letters with codes for the personalized fields. You might think of this as your letter template.
- A data source file with a row of information for each recipient. I’m using Excel.
- Your final Word letter file with the personalized letters.
The mail merge process uses your letter template + data source file = individual Word Letters.
The first step is to decide what to personalize. This requires knowing the content of your letter and your recipients. Using politicians as our example, they can get a .CSV file or .XLSX data extract with voter information from their election office. This file contains fields for:
- First Name
- Last Name
- Address 1
- Address 2
- City
- State
- Zipcode
You may add other fields to meet your needs. For example, you might add a field called “Event.” This could show an event time to meet the candidate.
Review & Fix Data Records
Before creating your letter, you should check your data source file. I don’t think I’ve seen a data source file that didn’t need correction. This is especially true if you didn’t input the data. Some common problems I look for are:
- Capitalization errors such as all CAPS
- Missing field data
- Invalid email addresses
- Initials as a first name
- Missing apostrophes in last names (Oneill)
- Misspellings
The top item can be fixed using the Excel Proper function. You don’t need to worry about deleting columns you won’t use in the letter.
You may need to worry about the First name field if you want to convey that you know someone. For example, your data source may have a formal name such as “Robert,” but you know the person as “Rob.” Salutations can also be an issue if you’re not familiar with first names. For example, I can attest to knowing female “Michael”s and male “Merideth”s.
Before saving your Excel file, make sure you have a header row with descriptive column names. This makes it easier to match and merge fields.
Allowable Data Source File Types
In this tutorial, I’ve used Microsoft Excel as my data source. Typically, if people have Microsoft Word, they also have Excel. However, you don’t have to use an Excel file. For example, the mail merge wizard accepts different file types:
- Office Database Connections (*.odc)
- Access Database (*.mdb, *mde. *accdb, *accde)
- Microsoft Office Address List (*.mdb)
- Microsoft Office List shortcuts (*.ols)
- Microsoft Data links (*.udl)
- ODBC File DSNs (*.dsn)
- Excel files (*.xlsx, *xlsm, *.xlsb, *.xls)
- Web pages (*.htm, *.html, *asp, *.mht, *.mhtml)
- Rich Text Format (*.rtf)
- Word Documents (*.docs, *.doc, *.docm)
- Text Files (*.txt, *prn, *.csv, *.tab, *.asc)
- Database Queries (*.dqy, *.rqy)
- Open Document Text Files (*.odt)
The advantage of using Microsoft Excel is that it’s easy for Word to parse the data, especially if you include column headers. When you use some of these other formats, you may have to define encodings, data fields, or field delimiters. In some cases, Word has no problems, such as with this CSV file.

With other formats, you may encounter difficulty. For example, the parsing is more complex if I try to use a Microsoft Word document as my data source file.

Link the Excel Data Source File
As with many tasks, Microsoft created a helpful wizard. Before starting, make sure you have created your recipient list with the fields you need.
- Open Word with a blank document or your Word letterhead.
- From the Mailings tab, select Start Mail Merge
- From the Start Mail Merge menu, select Step by Step Mail Merge Wizard. The Mail Merge task pane will appear on the right side of your screen.

- Click the Next: Starting document link at the bottom of this panel. The Wizard advances you to Step 2.
- Keep the default option for Use the current document.
- Click the Next: Select recipients link at the bottom.
- Click the Browse … link in the middle of the panel. This opens the Select Data Source dialog.
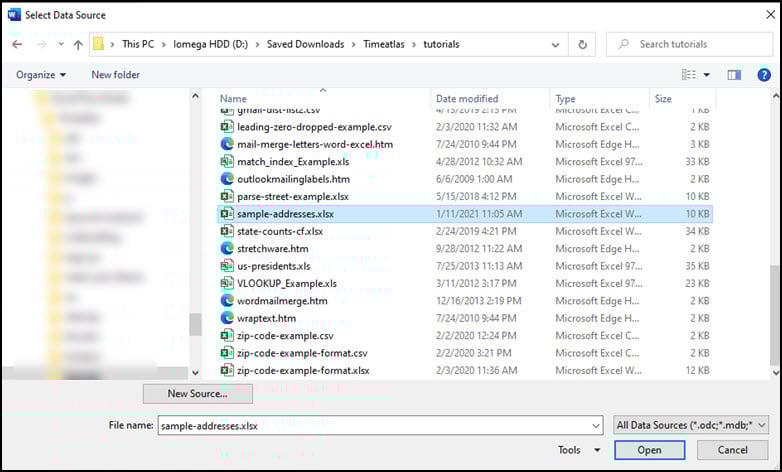
- Navigate to your Excel file and click Open. This opens the Select Table dialog. If you named your Excel worksheet, the name would show. Otherwise, it will appear as Sheet1$.

- Check the box at the bottom for the First row of data has column headers.
- Click OK. Below the Browse… link, you should see an active link for Edit recipient list.. .on the Mail Merge task pane.

- A dialog will appear on your document with your recipients. You can uncheck items you don’t wish to import from the 2nd column. It’s the one that is not labeled. You can also refine the list order and remove duplicate records.

- Click OK again.
- The Mail Merge Recipients dialog disappears. You will still see Step 3 of 6 in the Mail Merge Wizard.
Add Address Merge Codes
The Mail Merge wizard should be on Step 4 of 6. Now that we’ve assigned the data source, we can insert the merge fields in our letter. The first code most people start with is the address. While you can insert merge codes for each address element, Word allows you to enter all the fields with an Address block.
- On the Mail Merge task pane, click Next : Write your letter. This will advance you to Step 4. The merge wizard will show links to various letter components.

- You should now write your letter.
- Click Address block… to add the recipient’s address.

- Check the options that best suit your addresses.
- Use the controls under the Preview section to spot-check some records.
- Fix any address fields that you’ll use that show as (not matched) by selecting the proper field using the arrow control.
- Click OK.
On your Word document, you should see «AddressBlock». This code represents the address fields you selected. And no, you can’t wrap chevrons around your field names. You won’t see any real data until you merge the information.

Add Other Merge Codes
While adding address information is useful, you probably want some custom fields. These fields should have been defined on the Excel spreadsheet you linked. For example, you might tell people about an upcoming event. The process of inserting more fields is similar to the address block.
- From the Mail Merge task pane, go to Step 4 of 6.
- Add your letter text up to the point where you want to insert the field.
- Click More Items… from the task pane. The Insert Merge Field dialog appears.

- Highlight your field, such as “event.”
- Click Insert.
Your merge field should show next to your cursor. As before, the chevrons « » are wrapped on either end.
Pulling it All Together
You’re ready to pull real data once you’ve created your letter and added your merge codes. If you glance at your Mail Merge task pane, you should be on Step 4 of 6. To see your letters with merged data, click Next: Preview your letters. Each merge code should show data from your Excel data source file. You should not see any chevron merge codes.

While you may be tempted to print your letters, I would check several examples. In particular, look for addresses that need an extra line, such as suites or apartments. This is also a good time to look for seeded records to make sure the correct fields are imported. This can be done using the Find a recipient link on the panel. You can move through your letters by using the directional controls at the top of the task pane. If you don’t like a record, you can exclude it from the set.
If you use a window envelope or letterhead, print a sample letter to ensure alignment. If it isn’t, click the Previous link to go back to Step 4 of 6 and make adjustments.
Print and Save the Letters
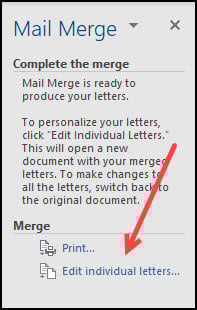
The final part of the wizard lets you print your letters. This is done by clicking Next: Complete the merge, which advances you to Step 6. You can print your letters or edit individual ones at this stage.
If the document you created is one that you plan to reuse, you should save it. You’ll see one letter with prefilled values when you save this document. You won’t see the chevrons and field names. What’s nice about saving this letter is maintaining the relationship with your data file and merge codes. The next time you open the file, it will read your data file and populate the merge codes. Then, if you want to send it to a different set of people, you can edit your Excel file or link it to a new one.
When you’re looking to contact a large number of people, it can be time-consuming and expensive to create personalized letters for each person. Remember to use the mail merge functions in Microsoft Word with Excel to make the process less arduous. Mail merging allows you to use an Excel spreadsheet as your data source to produce individualized letters by inserting names into pre-written text templates customized for your recipients based on their information from the spreadsheet.