Is Excel data entry slowing you down? Juggling multiple cells and long rows can lead to mistakes and wasted time. “Excel Data Forms” offers a more efficient solution. This powerful but often overlooked feature lets you input data with ease, reducing errors and boosting your productivity. This tutorial will show you how to create and use Excel Data Forms for a faster, more accurate data entry experience.
Knowledge You’ll Gain:
- How to create an Excel Data Form from your existing spreadsheets
- Simple techniques for adding, editing, and deleting records
- Methods for finding data within your forms
- Tips for using data validation rules to improve data accuracy
- Understanding the data form limitations
- Downloadable Excel practice file
I’ll admit that while Excel data entry isn’t difficult it can be tedious. You type in one cell and move to the next. However, I had a project where each record spanned past my screen width, so I had a horizontal scrollbar. Several cells contained a paragraph of pasted text.
I wanted an Excel data entry form that would allow me to focus on one entry. This would make copying and pasting information from a source document into the required textbox easier.
The problem with using the default data entry method is that it’s easy to lose sight of your target. You also have to navigate to the next row. An Excel form can solve these issues.
What are Excel Data Forms?
A data form is a modal dialog box with the fields for one record. The form sits on top of your Excel worksheet. It allows you to enter up to 32 fields per record on a cell-by-cell basis. On the right side, you have a series of navigation buttons and functional buttons. You might think of it as an on-screen form or template designed for data entry.

(A) Indicates the column headers that will show.
(B) Shows one record with column headers
(C) The worksheet name
(D) The number of records and control buttons
(E) Non-editable fields that are linked to formulas
The example above highlights two items I appreciate about the form. The first is Excel adjusts for the widest column width. Secondly, you can’t edit fields that are derived from an Excel formula. If you look at (E), the Population Change and % Change fields are disabled although the data shows. I don’t have to worry about overwriting the formula.
Essential Form Features
- The form isolates one record.
- Your orientation is vertical, not horizontal.
- You can’t add or edit data in cells containing formulas
- Some fields have keyboard shortcuts allowing you to jump within the form.
- You have a series of Form buttons on the right side to control navigation and filters.
- The whole record is committed as opposed to each cell.
- The record will inherit any conditional formatting rules
Using the form, I can enter data faster, and when I Tab to the end of the form, I can hit the Enter key to start another record. I can navigate through the records using the controls on the right side of the vertical scrollbar.
Enable Excel’s Data Form Feature
Before starting, you should check if you have the Form button. In earlier versions of Excel, this function was under the Data menu. If it’s not showing here, here are three options:
- Add it to your Quick Access bar
- Customize your Excel Ribbon and add a new tab or custom group
- Create a macro
I think the easiest option is to add it to the Quick Access bar.
How to Create a Data Entry Form
In this example, I’ll create a form based on an existing worksheet with 6 fields. Once the form is created, I can use it to add, edit, delete, and find records.
- Open your Microsoft Excel spreadsheet
- Verify your columns have a column heading.
- Click in any populated cell.
- Click the Form button.
If you have existing records, you will see a form for each record. The record count is shown above the New button. If your spreadsheet is new, you’ll see a blank form with your labels.
You can use the Close button to shut down the form. To open again, click any cell within your defined range and click the Form button again on your ribbon or toolbar. You will see the form related to the clicked cell.
Enhance Data Accuracy with Data Validation
Many seasoned Excel users like to use a feature called data validation. As the name suggests, this feature checks a cell’s value against a validation rule. There are many validation rules, such as time formats, number ranges, text length, etc. However, one item that can cause problems is when you use an Excel dependent list.
For example, in the screen snap below, I have a validation rule that checks whether the cell’s entry is contained on a “state” list. You’ll see a drop-down arrow to the cell’s right, which shows valid entries and a scroll bar.
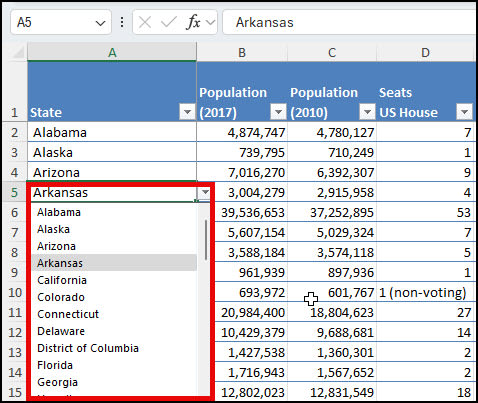
While I can use data validation with my data form, I will not see the drop-down list. Instead of choosing from a pick list, I’ll need to type my entry. The issue here is that you might make errors. In the example below, you’ll see I’ve tried to edit a state name to Disneyland.

Search Techniques for Data Forms
Data forms do have rudimentary filtering features. These can be found by clicking the Criteria button on the right side. The form will clear any values and allow you to enter some values including wildcard characters such as ?, *, and ~. The button label also changes to Form so you can toggle back and forth.
To Search Data Entry Forms
- Open your form.
- Click the Criteria button on the right side.
- Enter your search values in any of the fields.
- Click Find Next.
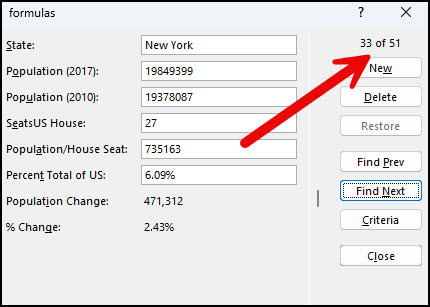
In the example below, I’m looking to find states with more than 15 members in the US House.

While this search works, it returns one matching record at a time. To navigate to the others, you will use the Find Prev and Find Next buttons. If you need to see your search parameters, click the Criteria button.
Apart from number searches, you can also use wildcards as well. A question mark will represent any single character, and an asterisk will represent any number of characters. Here’s an example of finding states with the letters “new” and greater than 10 House seats.

While the search criteria feature is handy, I prefer to use Excel’s AutoFilter feature. The issue I have with the data form is the way it shows the record number. If you’re not certain about your dataset, you might think there were 51 matching records as opposed to this being the 33rd record. I also wish there were error messages when no matching records are found.
Understanding the Limits of Excel Data Forms
As much as I like this form’s functionality, there are some limitations.
- If you get an error saying too many fields in the data form, you may have more than 32 columns. If so, try using a smaller range.
- If you get an error that states, “This can’t be applied to the selected range,” you probably clicked a cell outside the range.
- If your sheet has dependent lists, they won’t show in the data form. However, the logic will still work.
- You can’t print a data form record. Instead, you could use SnagIt or some other screen capture program.
- You can’t enter an Excel formula into a data form field.
- If you added data bars using conditional logic, the field is editable.
If you need more than 32 fields, you can use a 3rd party utility. John Walkenbach had one which can be found using the Internet Archive.
Stop wrestling with cumbersome data entry. With Excel Data Forms, you can streamline your workflow, reduce errors, and boost productivity. Ready to see the difference? Download our free practice file and start mastering Excel Data Forms.