Looking for a way to add a personal touch to your mail? In this tutorial, I’ll walk you through the process of creating custom address labels in Microsoft Word, complete with your own images. It’s simpler than you think, and the result is sure to impress your recipients.
It goes without saying that adding return address labels to envelopes and packages is a good idea. No one wants their mail to end up in the dead letter office because we forgot one. Although this tutorial is for making labels with graphics, you could use the same steps for any identical label where the contents are the same or have a “write-in” area such as name badges, bookplates, gift tags, and so on. And yes, it’s easier than Word mail merge or creating your own gift certificates.
Select Mailing Label Type & Vendor
Microsoft Word offers many label vendors and product sizes. I used Microsoft as the vendor for this tutorial and 30 labels per page. However, you’re free to choose different label sheets.
- Open a new Microsoft Word document.
- Click Mailings from the top menu.
- Select Labels from the Create group.
- In the Envelopes and Labels dialog box, click the Labels tab.
- Click the Options… button to find your address label size.
- In the Label Options dialog box, select your Label supplier from the drop-down menu
- Select your Product number (label type) from the menu.
- Click OK. You should see your label selection shown with a graphical representation.

- Click the New Document button.
You should now have a document showing blank address labels.
Add Your Label Graphics
The size of your image will vary depending on your label dimensions and how you plan to use it. For example, the logo image I’ll use was trimmed and resized using the SnagIt editor. This is not a requirement, but I find SnagIt’s editing tools easier to use, especially if I want a transparent background.
- Click in your first label area.
- Press your space bar and then Enter. (This provides a little buffer room.)
- Click Insert from the top menu.
- Click the Pictures button in the Illustrations group.
- Navigate to where your image is stored.
- Click Insert.
- Use the sizing handles to adjust the image size.
Your image should show in the first label slot.
Add Address Text & Formatting
Now we want to add a mailing address to the right of the image. Ideally, you want your image to be the same height as your label to avoid spacing issues.
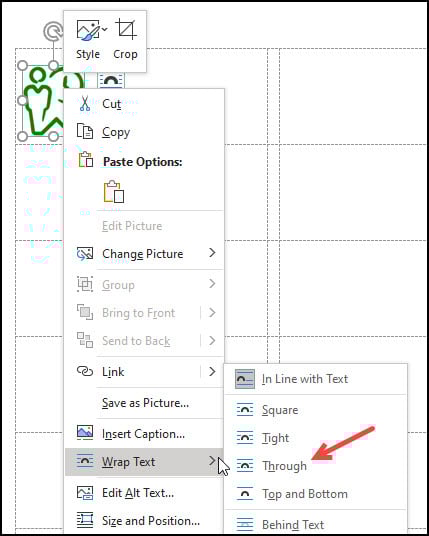
- Right-click your image.
- From the menu, select Wrap Text and then Through.
- Click to the right of your image.
- Add your mailing address.
- Apply any styling to the text.
At this stage, we’ve completed the first address label.
Create a Full Sheet of Labels
The last part is to copy our first label to the rest of the mailing labels. And this is where it may get a little tricky, as this first method doesn’t seem to work in newer Word versions. I’ll provide alternative solutions. Think of this first part as building a label template.
- Use your mouse to copy the mailing label contents we just created, including the image.
- The contents will highlight.
- Click Mailings from the top menu.
- Click Labels.
- Paste your content.
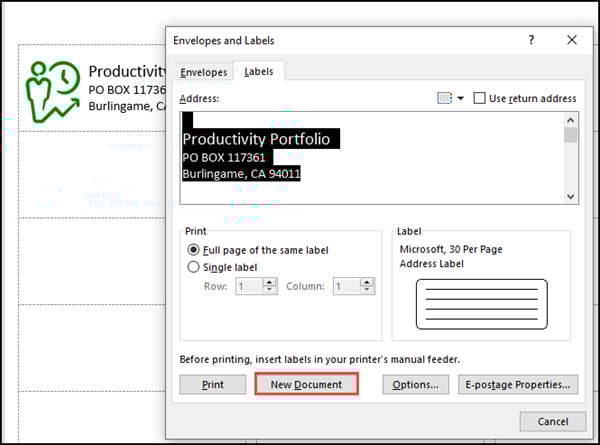
- Make sure the Full page of the same label radio button is enabled.
- Click New Document.
You should see a full sheet of labels with your image and address. If you plan on printing your custom labels regularly, you should save the document and use it as a template.
Alternate Solutions
For some reason, the graphic image doesn’t always come through. At first, I thought maybe it was because I was using an SVG image. But that wasn’t the case. It failed for me with JPG and PNG images. One option is to copy the first label with the image to the blank label slots. If you have a few custom labels, this works fine.
However, if you use a sheet with lots of labels, a better solution is to do a “pseudo mail merge”. Sorry, that’s the best name to define the process. Don’t worry, we won’t be doing a mail merge and adding a source file.
- Create your first image label as before.
- From the top menu, select Mailings.
- Click the Start Mail Merge button.
- Select Labels.
- In the Label Options dialog box, click the Cancel button.
- From the Write & Insert Fields group, click Update Labels.
You should now have a full page of image labels but with unnecessary merge field codes. We’re almost there.
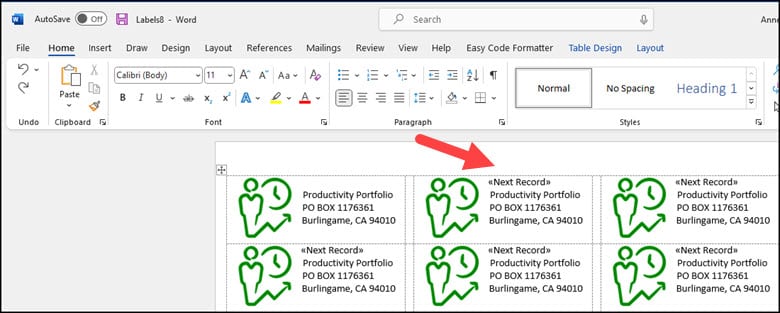
- Highlight and copy the merge code. In my example, it’s «Next Record».
- Press Ctrl + h. This opens the Find and Replace dialog box.
- On the Replace tab, paste your merge code to the Find what: field.
- Keep the Replace with: field blank.
- Click Replace.
- A small box appears asking if you want to search the rest of the document. Click Yes.
- Save your document.