When viewing an online video, have you ever thought, “Is there a way to play it faster?” In this tutorial, I’ll show several ways to speed up video, whether using Windows Media Player, QuickTime, YouTube, or some other service. And no, you don’t have to get a video editor.
I never worried about video playback speed until I took an online course where the lessons averaged 120 minutes. I don’t know about you, but I get antsy after 90 minutes. Sometimes I just wanted to fast-forward the video to the end. The problem with that strategy is you often lose good content in between.
My optimum solution was to figure out how to speed up the videos on Microsoft Windows but at a constant and pleasant rate. This is similar to how I used Audacity to speed up my audio files. By “pleasant,” I wanted something close to the original speed but without hearing annoying chipmunk voices or seeing people in highly animated modes.
Adjust YouTube Video Speed
If your primary goal is to speed up YouTube videos, the option is now built-in. The steps are simple: adjust the playback rate from 0.25x speed to 2x.
- Find a YouTube video.
- Click the circular gear icon in the lower right of the video control bar.
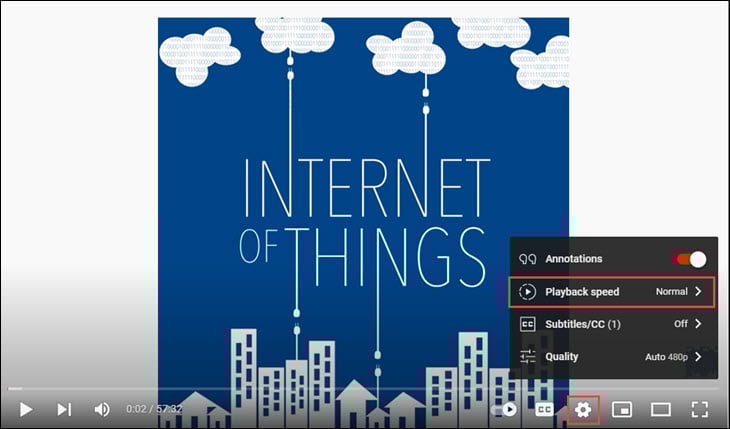
- A small pop menu will appear with options for your video.
- Click Playback speed.
- Select your preferred speed from the menu.
Change Playback Speed – Windows Media Player
Sometimes the video you want to speed up is downloaded, such as a .avi, .wmv, or .mp4 video. In this case, I would use Windows Media Player enhancements. The free program is included with most versions of Microsoft Windows.
To Adjust Windows Media Playback Speed
- Open your video in Windows Media Player.
- Right-click to open the pop-up menu.
- Choose Enhancements.
- Select “Play speed settings” from the drop-down menu.

- Adjust the slider bar from 1x to your desired playback speed.

3rd Party Video Players Options
Aside from YouTube, many video players embedded on websites include options to control the playback speed. For example, looking at our Excel Transpose video, you will see a similar control in the bottom right corner. But, again, you need to click the gear icon. Our default video playback is 1x, but the Speed option ranges from 0.5x to 2X.

How to Speed Up QuickTime Player
Another popular video player is Apple’s free QuickTime video player, once bundled with iTunes. Unfortunately, Apple no longer supports the program, but people still use it. It plays .mov, .mp4, .avi, and MPEG-1 files. Like Windows Media Player, it also allows you to adjust the speed of downloaded videos.
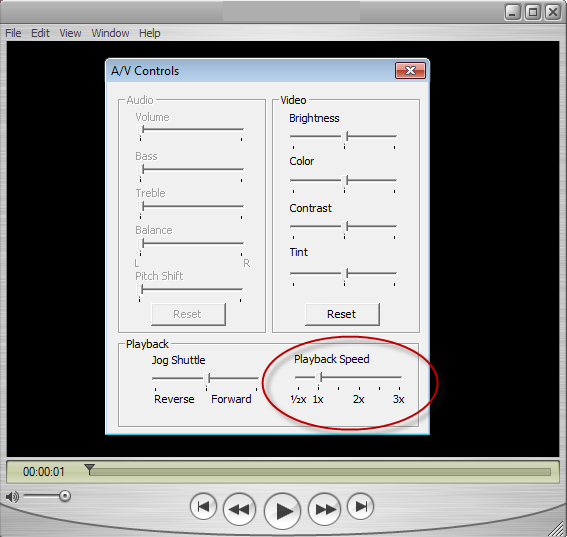
To Adjust QuickTime Playback Speed
- Open your movie in QuickTime Player.
- From the Window menu, select “Show A/V controls.”
- Adjust the slider for Playback speed in the bottom right. Your options are from half-speed to 3x normal.
Video Speed Controller Browser Extension
While many videos now have a toolbar that allows users to change speed, some do not. For example, I host my videos on Wistia, and they provide this feature. However, HTML5 videos have a feature that allows the playback speed to be controlled even if the toolbar doesn’t show that feature. One popular Chrome browser extension that leverages this feature is Video Speed Controller. It’s a small configurable toolbar that sits atop the video.
Apart from using the toolbar buttons, you can also use keyboard shortcuts. In addition, the toolbar has a settings panel that allows you to change key assignments, speed values, and even blacklist sites where you don’t want the toolbar to show. Another advantage is using the toolbar on local files you view in the Chrome browser, although you’ll need to change some Chrome settings. The link above is for Chrome, but Microsoft Edge works with these extensions.
The extension only works on HTML5 videos.
Adobe Express Change Speed Tool
Another free option if you created a video is to use Adobe Express to change the playback speed of your source file. The process is simple: upload your video file and choose the Change speed option. Your speed choices are:
- Super Slow (25%)
- Slow (50%)
- Normal (100%)
- Fast (150%)
- Super Fast (200%)
You also have the option to mute your uploaded video. Once the system converts your file, you can download it.

While the system is exceedingly simple, increasing my video speed to 150% and turning Mute on considerably increased my file size. The tool works with videos of less than 60 minutes.
Working With Flash Videos
Sometimes you need to speed up videos embedded on websites, but the video player only has a play button and volume controls. In these instances, the best program I’ve found is Enounce MySpeed. It’s a small app that monitors online videos. If the tool detects that it can adjust the video speed, it displays a small slider. This slider allows you to adjust video playback speed within a set range from .3x to 5x. The program works with Flash and HTML5 videos. Unfortunately, it does not work with QuickTime videos.

In my testing, I could quickly speed up the video to 1.4-1.8x without feeling I was losing information. Sometimes, I could go faster, depending on the speaker and the content. Some content isn’t made to go too fast. Moreover, the voices take on an annoying pitch if the video plays too fast. This problem happens in all players, and I think MySpeed has less sound distortion than other programs.
One limitation of MySpeed is the program doesn’t work on all online video files. For example, it won’t work on my early tutorials that used captions. The problem is that Enounce needs to have a sound stream for its algorithm to work. The program also requires Adobe Flash, which some people block for security reasons.
Speeding up videos requires dragging the slider bar control to the right. If the program detects a flash video, you’ll start seeing and hearing the video at a new speed. Your setting remains in place for subsequent videos.
MySpeed includes a fully functional 7-day trial, or you can purchase the Windows version for $29.95. They have both Windows and Mac versions. I encourage you to start with the trial before purchasing to ensure no compatibility issues.
Unfortunately, the site hasn’t been updated in a while, and they make no mention of Windows 11.
Regardless of what type of video you’re watching, there are ways you can adjust the playback. The key is to find which speed works for you. For example, I like to view material using a moderate speed increase when learning material. Then, on subsequent passes, when I’m reviewing material, I’ll increase the rate even more. The bottom line is that you can control the speed if you wish.