Ever feel you’re at an audio buffet table and you’ve loaded up on too much content? This recently happened to me with some audio courses and podcasts. I didn’t have enough time to hear all the lectures and conference calls. I needed to find a way to shorten the listening process. The solution was easier than I thought using the free sound editor and recorder called Audacity.
There are audio players that have a fast playback option built-in, such as QuickTime Player or Windows Media Player. The steps for speeding up audio files in these programs are similar to speeding up video playback. Even the music players on iOS devices include playback speed options at 2X.
While I had some success with these options, I wasn’t happy with the results. Sometimes the playback sounded too squeaky like Alvin and the Chipmunks. Other times, my audio settings wouldn’t stick. I also wanted to be able to fine-tune and not be locked to a specific playback speed option. I figured instead of letting the player do the work, I would tackle the source file so I could use it on any MP3 player.
Using Audacity to Change Audio Files
If you’re not familiar with Audacity, it is a free audio utility that can do many things to sound files. Using this utility, I concentrated on two issues:
- Removing silence from the audio files
- Decreasing the playback time by adjusting the tempo
Removing the Silence
If you think of any conversation, you realize that it’s natural for people to pause. This also happens when you’re on conference calls and waiting for callers to speak. I didn’t want to spend time listening to this. In one of my audio files, I was able to cut the listening time from 5h 20m to 4h 25m.
To remove the silence from your audio file,
- Download and install Audacity.
- Open Audacity.
- From the File menu, select Open…
- Your file(s) will now show in the main window as a horizontal band.
- From the Select menu, choose All.
- From the Effect menu, select Truncate Silence…
- On the Truncate Silence dialog, click OK.


The band representing your audio track should be shorter. The amount will vary based on how much silence was trimmed.
Some people may find removing the silence is good enough and stop there. If you don’t like hearing people speak fast, you can jump to Step 12 and export your file.
Speeding Up The Audio
Another benefit of Audacity is it can reduce the time it takes to listen to the file. There are several ways to do this. Although the software has a feature called “Change Speed”, I preferred to change the tempo. I felt that when I used the change speed option, I was getting too much chipmunk effect. Part of this depends on your audio content, settings, and preferences.
I like to apply the tempo feature after I reduce the silence because my sound file is still loaded. I also glance at the time setting in the lower corner before I start the process and after.

- From the Effect menu, select Change Tempo…
- In the Change Tempo dialog, enter a value. I prefer 25%, but you should experiment as people speak at different rates.
- Click OK.
- Press the Play button. If it doesn’t sound right, you can go to the Edit menu and select Undo Change Tempo.
- From the File menu, select Export Selection…
- In the Export File dialog, give a file name and Save as type: . I like to append codes to my file name that represent the effect. As example, I added “sr” to the file name so I know this is the version with silence removed.
- Click Save.
- Add in any Meta info and click OK.


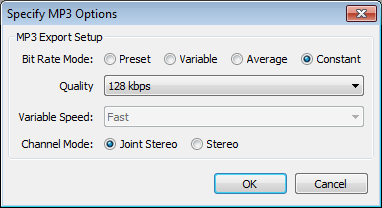
Note: You may also want to click the Options button if you wish to change the Quality rate. The higher the Quality setting, the larger your audio file size. If you don’t know the BitRate of your original file, you can find it by using Window’s File Properties and clicking the Details tab.
Although the Meta info section is optional and can be turned off, I find it a nice way to organize my files. I could add my own genres and comments.
After playing around with this process, I’ve gotten to where I can convert a file in less than 5 minutes. From my perspective, that’s a pretty good return on my time. Just be careful not to get caught up in the other Audacity features until you need them.