Do large Word documents eat up your storage? Discover how to compress a Word document with our detailed guide. You’ll learn practical steps to reduce file size without losing quality. In this tutorial, I’ll outline 7 tips showing how to compress a Word file.
Tip 1 – Insert Graphics instead of Using Copy and Paste
People like to use copy and paste to add graphics to Microsoft Word. The feature is effortless, but it’s not efficient as the pasted image is a bitmap file. In addition, the differences in file sizes can be astounding, especially if you’re using a file format such as JPG as your source.
To insert a picture in Microsoft Word,
- From the Insert menu, select Picture
- From the submenu, select This Device.
- Navigate to your picture and click the Insert button.
Tip 2 – Compress Pictures
In most cases, you can compress pictures without your reader noticing a difference. This is also an area where you can experiment with your own tastes. One item to note is the menu option only shows if Microsoft Word is in full-screen mode.
To compress a picture in Word,
- Click the picture in your document.
- You should see a sizing border appear around the image.
- Click Picture Format from the top menu.
- Click Compress Pictures on the toolbar.
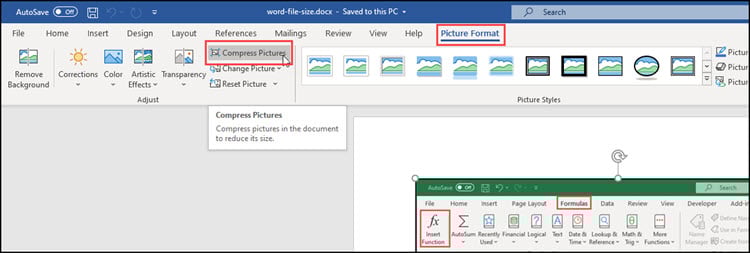
- Make your selections on the Compress Pictures dialog box. The options will differ based on your document.

Also, remember you can reduce image file size with tools other than Microsoft Word.
- Click OK.
If you don’t see the compress picture option, you can type the words into the Search box at your toolbar’s top.
TextExpander: Worth It? Find Out.
Is TextExpander the right tool to boost your productivity? Get an independent assessment, weigh the pros and cons, and make an informed decision. Find out why I’m a fan.
Read the ReviewTip 3 – Turn off Thumbnail Picture
The thumbnail picture is the small image of the document’s first page. This used to be called a “preview image.” It shows in Windows File Explorer, but I find it inconsistent and don’t use it. I’m sure there is some use case where value is added. However, I haven’t found it.
My concern is that if you have a large graphic on your Microsoft Word document’s first page, you can easily add 100k to the file size.
To See if Thumbnails are On
- Open your Word document.
- From the File menu, select Save As. If you save your files to OneDrive, the menu option is Save a Copy.
- Keep the original file name.
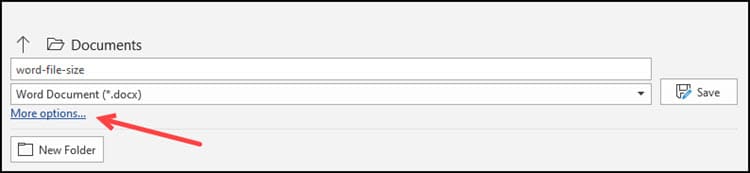
- Click the More options… link.
- Deselect the checkbox for Save Thumbnail.

- Click Save.
The same procedure works for a new document. Make sure you don’t tick the Save Thumbnail option.
Tip 4 – Use the Latest File Format
Sometimes old habits are hard to break. For example, I’ve met some people that still save their Word documents in the older .doc file format. Their thinking is the newer versions of Word are backward compatible. While true, the .docx file format offers more features and better file compression.
Tip 5 – Remove Hidden Properties
If you’ve ever played around with digital photos, you know that the camera captures more information than the user can see. Microsoft Word is similar in that it also contains data that isn’t easily viewable from the front end. This is mostly metadata and may not be of any value. And in certain cases, this data may include personal information. The amount of data depends on the size and complexity of the document. All this is contained within the Inspect Document function.
This feature is destructive because it does remove data from your document. In most cases, this is acceptable. However, if you’re in an organization that wants to preserve reviewer comments and other items, I would do a File Save As and rename. This way, you’ll have the original file.
To Inspect Your Document and Remove Info
- Open the Word document and save any recent changes.
- From the File>menu, select Info.
- From the Info panel, click the Check for Issues button. It is to the left of the Inspect Document.

- You may get a reminder to save your document. If so, click Yes.
- The Document Inspector panel appears.
- Select the items you wish to check. Microsoft provides more details if needed.
- Click the Inspect button. The document scan starts.
- Click the Remove All button to the right of the items you wish to permanently delete. You may have to scroll down the list.
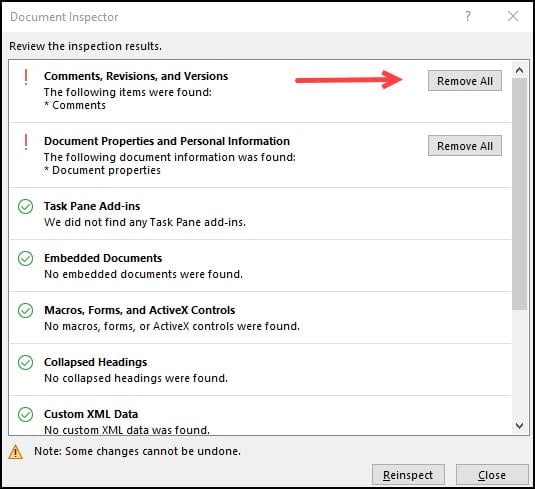
- Click Close.
Any of these five tips should help compress your Word file. Some of these tips will result in better file size reductions than others based on the document elements.
Tip 6 – Convert to Another File Format
One question you might ask is whether you can convert the Word document to another file format. For example, you might try converting your original file to PDF. Some people have had success with then converting that PDF file back to a Word document.
I had no success in reducing my Word file size by converting it to either PDF or converting the PDF back to Word. In fact, the PDF versions were close to the size of the original. However, when I tried to convert those PDFs to Word, the file size increased dramatically. As the saying goes, your mileage may differ.
I think part of the issue is that Microsoft Word retains a lot of code to convert file formats easily. This is something I encountered when converting Word files to HTML.
Tip 7 – Use an Online Word Compressor
My preference is always to try to fix issues internally. However, there may be times when you’ve tried all the steps above to compress the Word file size, and it’s still too large. In those cases, you might want to try a 3rd party service. These services work in various ways but try to preserve the document quality.
Before submitting a document, ask yourself these questions:
- Does your Word document have any personal or company confidential information?
- Does the service delete your files in a timely manner?
- Does using the service mean you’ve committed to being on a mailing list?
- Does the service have an easy means to contact them?
- Does the service have a privacy policy and tell you what they do with your information?
- Does the service add any watermark or branding to the new Word file?
As you can see, you can compress Word files in many ways. It really comes down to how much time you want to spend to get the smallest size. These tips will help you reduce Word file size, but be careful not to go overboard.