In Outlook.com, you can add a personalized signature to your email message that links back to your website or social media profile. Having a customized email signature is an additional way of promoting yourself and your brand within the context of email communication. In this tutorial, I’ll show you how to add an Outlook.com signature.
Different Versions of Microsoft Outlook
For starters, Microsoft has multiple versions of email products. These include:
- Outlook.com – this is the free web-based webmail version that is a worthy competitor to Google’s Gmail. It’s the successor to Windows Live Mail and Hotmail.
- Outlook Office 365 – This is part of the yearly Microsoft 365 paid subscription service. New features are rolled out monthly.
If you have one of the paid versions, you should use this Outlook signature tutorial instead.
Creating the Outlook.com Email Signature
For the most part, you can create very similar signatures between the Outlook versions. A noticeable difference is that you can’t insert business cards on the free version. These have the advantage of adding a vCard attachment to your emails.
- Log in to Outlook.com with your web browser.
- Click the Settings icon on the toolbar. It looks like a gear or cog icon.
- The Quick settings panel opens on the right side.
- In the Search textbox, type “signature.” As you type, Outlook.com will filter the settings options.
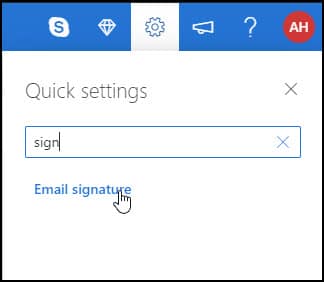
- Click Email signature. The Compose and reply panel opens.

- Provide a name for your email signature. [See A]
- Add in your desired email signature elements such as name, job title and so on in the main text area [See B]. You can use the styling toolbar at the bottom to apply any formatting.

- You may also add images using the Insert Pictures button.
- Click the Save button.
- From the drop-down menus, [See C] set which signature to show for new messages and replies. If you don’t select an option, you’ll need to add the email signature manually.

- Click the Save button.
- Click the Close box [X] in the upper-right corner to close the Compose and reply panel.
Manually Add Outlook.com Signature
If you didn’t select an inclusion option for your signature, you could manually add it to an email.
- Open your Inbox.
- Click the + New message button from the left side.
- Click the … button. It’s to the right of Discard.
- From the drop-down menu, click Insert signature and your desired signature from the list

The email signature you created will be added to the bottom of your email and the cursor will be several lines above.
Outlook.com Signature and Images
If you plan to use images in your signature, just remember they will not show if you send your email as plain text instead of HTML. When you change the message format, the image will disappear.