Ever faced a baffling computer issue on Windows 10? You’re not alone. Discover the built-in Windows troubleshooting tools designed to resolve those problems. Before seeking expert advice or commercial software, consider these free solutions to set things right.
This list is not comprehensive or detailed, which is why I have provided links to additional information. Before making system changes, please back up important data and make sure you have your Windows passwords. It helps if you have a password manager on another device you can reference, like your phone. The steps mentioned are for a Windows 10 computer and may differ with other Windows versions.
How to Boot into Windows Safe Mode
Safe Mode is mainly used to troubleshoot a problem using a minimum configuration. Think of it as a bare-bones configuration. The theory is if your problem goes away when you use Safe Mode, then the issue is most likely with something you added to your PC and not a Microsoft Windows problem. This could be either software or hardware.
This is a diagnostic mode and not meant for aesthetics since your icons and desktop load with the words “Safe Mode” in each corner. Windows doesn’t load any drivers or services you need for sounds, external drives, networks, and so on. Many programs or services that normally load during startup will not execute. This is why it is often recommended as the starting point to remove viruses and malware.
If your computer works in Safe Mode, you can guess something outside the basics is causing the computer problem. You might start thinking of items that were recently added to the computer.
TextExpander: Worth It? Find Out.
Is TextExpander the right tool to boost your productivity? Get an independent assessment, weigh the pros and cons, and make an informed decision. Find out why I’m a fan.
Read the ReviewTo boot into Windows Safe Mode,
- Press your Windows key
 + i.
+ i. - From the Settings panel, type safe mode in the Find a setting textbox at the top.
- Press Enter.
- Select Change advanced startup options.
- From the Recovery panel, click the Restart now button under Advanced Settings.
- From the Choose an option panel, select Troubleshoot.
- From the Troubleshoot panel, select Advanced options.
- From the Advanced options screen, select Startup Settings.
- From the Startup Settings screen, click the Restart button.
Your screen will go blank for a bit, and then the Startup Settings page reappears with some options. The two you want to focus on are options 4 and 5. Option 4 is plain Safe Mode. Option 5 allows you to load network drivers and internet access. If your issue concerns a program that needs online access, choose option 5.
- Press your desired option, either 4 or 5
Your PC will reboot, and you may need to enter your password. The words Safe Mode will show in each corner of your screen. If you chose Option 4, you’d see a tip appear on getting connected to the Internet without Networking.
- Try to recreate your initial problem while in Safe Mode.
More Info: Microsoft KB on Safe Mode options. It’s written for Windows 7, but they still apply.
How to do a System Restore
Think of System Restore as an easy-to-use historical recovery tool. System Restore allows you to revert to a previous set of system files and registry keys. It doesn’t include personal files such as items you’ve created in My Documents. In other words, the program can’t help you if you delete your Excel spreadsheet, business plan, email, and so on. This is best used if you encounter a problem with a recently installed program or update.
To use System Restore,
- Press your Windows key + i.
- From the Settings panel, type safe mode in the Find a setting textbox at the top.
- Press Enter.
- Select Change advanced startup options.
- From the Recovery panel, click the Restart now button under Advanced Settings.
- From the Choose an option panel, select Troubleshoot.
- From the Troubleshoot panel, select Advanced options.
- From the Advanced options screen, select System Restore.
- From the System Restore panel, select your account.
- Enter your account password.
- Click the Next button on the System Restore program.
- Click a restore point that is closest to when your problem started.
- Click the Scan for affected programs button. This may provide more details on what was changed.
- Click the Next button.
⚠ Before confirming your restore point, close all open files. Also, think if you have changed your password since the time of the restore. If so, create a password reset disk.
- Confirm your restore point and click the Finish button.
- Click Yes to continue.
- Leave the PC alone until the restore is complete.
- Click Restart.
- Click Close.
- Test your PC to see if your problem cleared.
More Info: Microsoft article on recovery options.
How to Reset Your PC
Over time, all computers get cranky. You may have noticed odd errors and the PC getting slower. It’s just not the slick machine you fell in love with, but don’t want to part ways with.
In these scenarios, you might want to try the reset recovery options. This procedure provides for more options, such as what to do with your personal files. All the same, it’s more invasive than using a restore point above. The process takes a lot longer. Ideally, you’ll want a listing of programs that will need re-installing and the installation files.
Resetting your PC will,
- Remove all your apps, programs, and personal files*
- Revert to Windows default settings
- Reinstall Windows
* If you choose the Keep my files option, Windows will not remove your personal files. Personal files are within your user profile, such as in your documents, pictures, music, and video folders. For more info on personal files, you can view this SuperUser thread.
- Press your Windows key + i.
- From the Settings panel, select Update & Security.
- From the Update & Security section, select Recovery.
- From the Recovery panel, click the Get started button under Reset this PC.
A dialog will open with various options. It may vary based on your manufacturer. For example, in my notebook, I do not have an option to Restore Factory Settings. I have to Keep my files and Remove everything.
Regardless of your choice, you should make sure you have copies of your personal files and any installation files. This is especially true of programs you purchased online and any license codes. For the short term, you can upload your critical files to an online cloud solution like Dropbox, Google Drive, OneDrive, etc.
- From the Reset this PC panel, choose your option.
If you select Keep my files, Windows will show you a scrollable list of programs that will be removed. The list is probably longer than you expect as it includes vendor files. Give the list a peek to make sure there are no surprises. The good news is that after the reset, Windows creates a file called Removed Apps.html that will show on your desktop. The file will list:
- App name
- Publisher
- Version
In some cases, this file will also have hyperlinks to the publisher.
If you select Remove everything, you may be prompted about drives you have other than C:\
How to use CHKDSK
People who use DOS probably remember the CHKDSK command. Although the program still checks your hard disk drives for problems, there are three items to note:
- There is now a graphical interface for this program.
- To fix files, you’ll probably have to reboot your computer.
- Hard Drives are now much larger.
The program has several options. The easiest and fastest option is to have the program scan for errors. If it finds problems, a dialog appears and you can take the next step, which is to fix the problems.
To use CHKDSK to scan files,
- Press the Windows key + e to open File Explorer.
- Right-click the drive you wish to check.
- From the submenu, select Properties.
- On the Drive Properties dialog, select the Tools tab.
- Under Error-checking, click Check button.
- Click Start.
If you want the program to fix files instead of just scanning your drive, you should plan for this activity. Make sure you have backed up your important files. Depending on the size of the drive, it could take hours for this utility to finish. On huge drives, it can take more than a day to complete. During this time, you can’t use a computer.
CHKDSK is a nice free tool. However, if you encounter many errors, you might want to try a commercial tool like SpinRite to check the hard drive. It’s the tool I use and developed by the same guy who wrote the InSpectre tool.
How to Use Windows Device Manager to Spot Problem Devices
If you want attention, one way is to use punctuation and color. Microsoft does the same by identifying devices in problem states. In Device Manager, problems are identified by a yellow circle with a black exclamation point or a Red X.

The exclamation point to the left of an item means a device or device driver isn’t installed correctly. The Red X indicates that a device has been disabled or it can’t be found. In the screen snap above, you can see that one of my Bluetooth drivers has issues.
To Open Windows Device Manager,
- Press your Windows key + Pause key
- On the System dialog, click the Device Manager. This will show under the Control Panel column on the left.
If you spot a device in a problem state, you can right-click it and select Properties. This opens the Properties dialog that provides more information about the device. In the example below, you can see that one of my Bluetooth drivers failed to start.

As you can see from the example, there can be identification codes. Microsoft provides a support document explaining these errors and more.
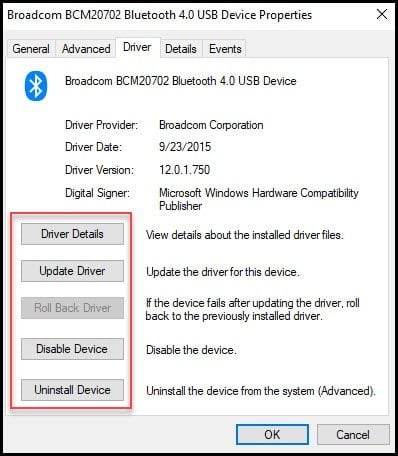
In some cases, you may need to take action on a driver. If you click the Driver tab, you’ll see a series of buttons. The options will vary based on your permissions and the specific driver. For example, I can’t Roll Back this driver.
These Windows 10 troubleshooting tools won’t resolve all your computer woes. However, the steps can help you fix or better troubleshoot Windows 10. They also come in handy when you don’t have a computer technician nearby, and all eyes are looking to you to fix the problems.