Overtime, Gmail accounts get cluttered especially when you’ve had an account for years. I needed a better way to clean it up. Using TextExpander to clean up Gmail simplified this process for me. I’ll show you how to build simple snippets for finding specific emails. You don’t even need to know Google’s search syntax to get started.
Knowledge You’ll Gain
- Learn how to create basic TextExpander snippets for Gmail searches
- Discover how TextExpander can help clean up Gmail by finding specific emails
- Create flexible snippets with fill-in fields for customized searches
- Find specific emails by content type, sender, size, and other criteria
- Link to 30-day free trial
Why Use TextExpander
If you’re not familiar with TextExpander, it’s a software program that expands text based on a predefined short code which they call an abbreviation. To give context and to comply with FCC guidelines, I can type $ + a + f + f, and TextExpander types out the paragraph below.
This article contains an affiliate link, which means that I may earn a small commission if you make a purchase through my recommendation at no additional cost to you. As an affiliate, I only promote products I genuinely believe in and think will benefit readers. My primary goal is to provide valuable and unbiased information, and any earnings generated through affiliate links help support the continued operation of this website.
Obviously, when it comes to Gmail there are numerous ways you can leverage this utility especially if you use boilerplate text. But the same program can also help you with Gmail maintenance tasks such as finding messages to delete.
A Basic Snippet
Some of the items included here are taken from a previous tutorial on mass deleting Gmail items. To start, let’s build a snippet that will find specific emails in our Promotions folder. In my case, I’ll delete emails from my local grocer.
- Open TextExpander and start a New Snippet. For organizational purposes, I put these in a Gmail folder and use the ; key as my prefix.

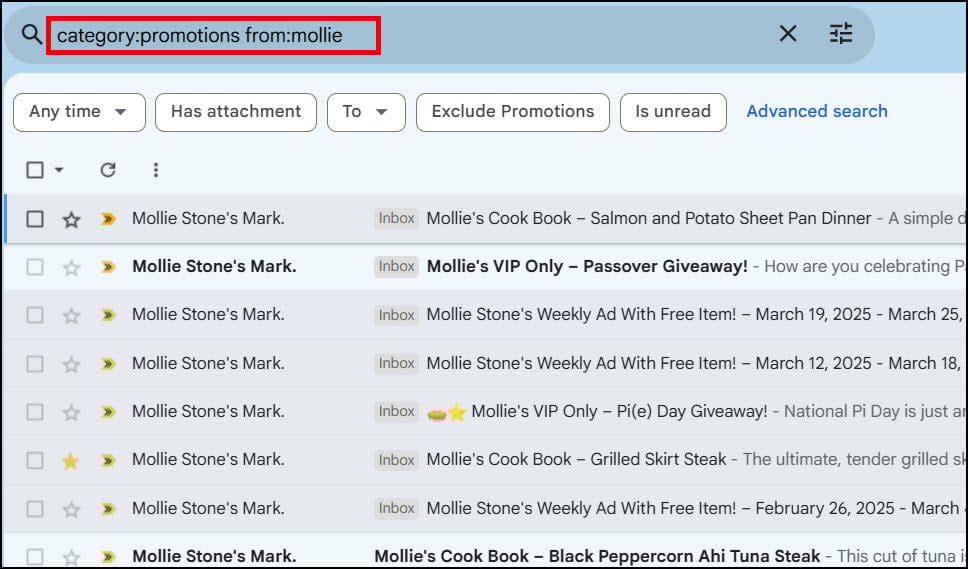
- In the text window type category:promotions. This is close to what you would get if you filtered your Gmail.
- On the same line after promotions, type a space and from:mollie. This tells Gmail I want emails in the Promotions folder that are from Mollie. You’ll notice I didn’t have to type the exact email address. I could also have used AND instead of a space. You can substitute a different name.
- At the end of your line, click the Keyboard macro button from the toolbar and select Enter.
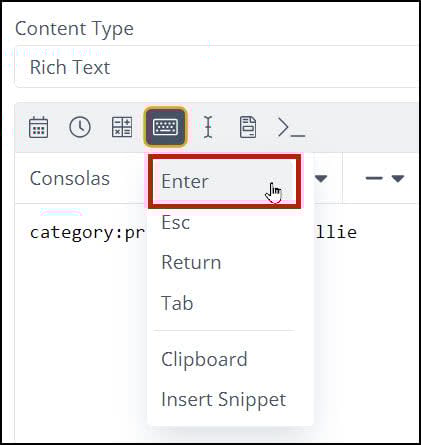
- Go to the bottom of Text Expander and fill in the Label and Abbreviation fields. I’m using ;gps.

- Go to your Gmail account and place your cursor in the Search mail textbox and type your TextExpander abbreviation followed by a space. You don’t have to press Enter since we added that key on Step 4. You should see your snippet in the textbox and the filtered emails.
- The last step is to toggle the checkbox above the first message to select all the items. A new toolbar appears where you can click the trash can icon to delete these items.
Realistically, you wouldn’t want to build a snippet like this for one email address. A better way would be to prompt for the text. In the next section, we’ll adjust our basic snippet and add a variable.
Make it Flexible with Variables
The main issue with the previous snippet is it just works for “mollie”. However, I have many senders in the Promotions category and I don’t want to make a snippet for each one. This is where variables or “fill-ins” are useful. The foundation is the same, but we’ll substitute one element.
- Open your previous snippet and double-click the word “mollie” and press delete.
- From the editor toolbar, click the Fill-ins button.
- Select Single Line Field from the drop-down menu.

- In the Name textbox provide your own label. I used Sender and kept the default width of 20 characters.

- Click OK.
- Your snippet will show the Fill-in field you created.

Now when I type the same TextExpander abbreviation, I’ll be prompted to enter a Sender. I’m no longer just looking for “mollie”.

Another thing you can do is string together multiple entries in this field using “OR“. If you plan on using this feature, you might want to make the field greater than 20 characters. Let’s show an example.

In this case, I’m filtering for from addresses that have either “swipe” OR “coursera”. It is important to use all capitals with OR. The example below shows emails from either of the two entries.

The reason why Duke and Vanderbilt show is because they have Coursera email addresses. You can see this if you hover over their names.
Leverage Gmail’s Advanced Search
As expected, everyone uses Gmail differently so there are scenarios that are much different than attacking the Promotions folder. You probably have a dozen examples already, but may not know where to start. The easy way is with Gmail’s Advanced Search. You can access from the icon on the right of the Search mail textbox.

The advantage of using this system is Google provides the syntax we need. You can then copy and paste the code to your TextExpander snippet.
- Click the Show search options icon.
- In the pop-up dialog enter your search criteria. In this example, I want to find all emails within the past year that are greater than 5MB in size.

- Click the Search button.
- Gmail will then show a search string that matches your criteria in the search bar.

- Create a new snippet in TextExpander and paste the code into the textbox.
- Edit the snippet to meet your needs. For example, maybe you want to make those “before” and after “dates” as Fill-in fields.
- Add your Keyboard macro for Enter.
Some Additional Ideas
Here are some additional ideas to get you started. You can hover over the text and a copy button will show. This will make it easier to get into your TextExpander. Unfortunately, I can’t paste in Fill-in fields or keyboard macros. You’ll have to do that in TextExpander.
Find PDF files that I’ve sent.
in:sent filename:pdf
Find emails I sent that had “invoice” in subject line
in:sent subject:invoice
Find any PDF files except for the ones I sent.
has:pdf -from:me
Find unread emails that are older than 2 years
is:unread older_than:2y
Find emails with YouTube videos
has:youtube
If you’re looking to make Gmail maintenance more efficient, TextExpander offers a powerful solution that goes beyond what I’ve covered in this tutorial. I’ve been using it for years on repetitive tasks and streamline my workflow.
You can learn more about TextExpander from my detailed review where I cover more features, pricing, and how it compares to alternatives. Alternatively, you visit their website and start your 30-day free trial.
TextExpander 30-Day Trial