For the most part, I like software updates and the new features they bring. The problem is when companies change the location of existing features. This was the case when a reader asked me, “where is the message options command in Outlook?” It is now buried, but you can bring other commands to the forefront by using the Outlook Quick Access toolbar.
The Problem
In previous versions of Microsoft Outlook, you could get to “message options” by right-clicking an email item. This was great because you didn’t have to open the email. I often used this feature to review the Internet headers. Although the feature still exists in Outlook, you now need to open the email outside the reading pane, click File, select Info and Properties.

For me, this is too many steps. Remember, I’m the type of person who tries to save keystrokes using features like Outlook Quick Parts and Outlook keyboard shortcuts. The good news is Outlook has a feature called the Quick Access Toolbar that solves this problem. If you’re not familiar with this toolbar, it resides in the top left corner just above the ribbon. You can add just about any Outlook command to this tiny toolbar, whether they be frequently used commands or ones buried deep within the program.

Add Commands to Quick Access Toolbar
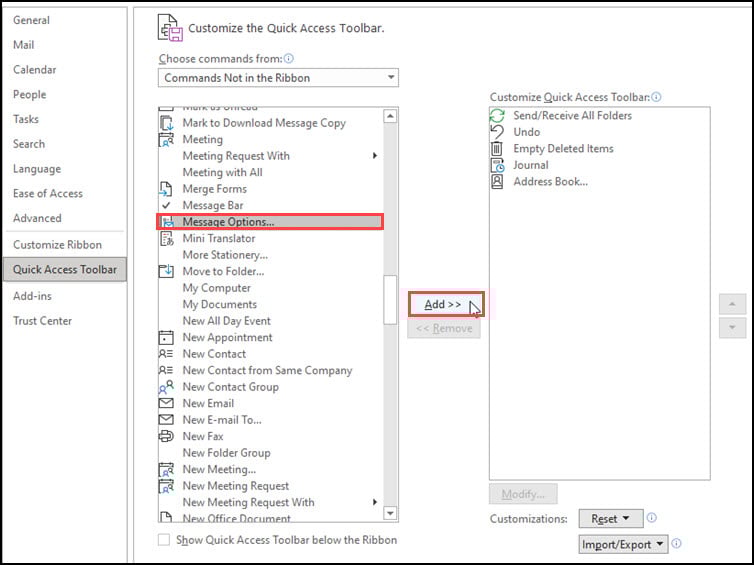
For this tutorial, I’ll be using the “Message Options” command as the item I wish to add.
- Click the small triangle icon on the Quick Access toolbar. A drop-down menu appears.

- From the Customize Quick Access Toolbar list, select More Commands…
- The Outlook Options dialog box will open, allowing you to choose commands. In the middle area labeled Choose commands from: select Commands Not in the Ribbon.

- Scroll down the alphabetical list and select Message Options…
- Click the Add >> button in the center to move your command to the Customize Quick Access Toolbar column.
(Optional): At this stage, you can change the toolbar items’ order by using the directional arrows on the right side.
- Click OK.
You should see a new icon on the toolbar representing the command you added.
Another nice feature is once you get Outlook’s Quick Access toolbar set up to your liking, you can export the settings to another computer. While there are countless commands you can add to the Quick Access toolbar, it doesn’t support everything. For example, you couldn’t add a custom Outlook task view.