Do you find yourself overwhelmed by your tasks in Outlook? Maybe you have difficulty finding the task that matches a particular project or category in the long list. Would you like to change how your tasks are displayed and sorted in Outlook to match your needs and work style? In this tutorial, I’ll show you how to customize your Outlook Tasks View.
Finding Your Task Views
Outlook has many views based on where you are in the program. It’s context-aware. For example, there are predefined views for the main Outlook areas. So, to see your Task views, you need to go to Tasks. Most people will have a Navigation bar at the bottom of their screen. Some people use a compact mode that shows icons, and others have the words such as the bar below.

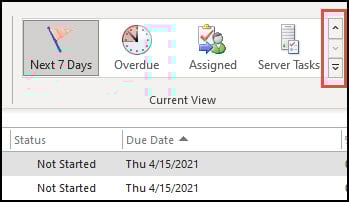
After you double-click Tasks from the Navigation bar, you’ll be on the last Task View you used. The Current View group will show one row with your current view highlighted. You can click the controls on the right to expose the other task view rows.
By default, Microsoft Outlook has a set of task views containing a predefined series of columns. All task views contain an icon, Subject, and Flag Status. However, some views offer additional columns, which I’ll show in abbreviations with brackets [ ].
- [CB] = Checkbox to mark completion
- [AC] = Attachment column
- [CD] = Created Date
- [DD] = Due Date
- [DC] = Date Completed
- [MD] = Modified Date
- [DC] = Date Completed
- [%C] = Percent complete
- [IF] = In Folder
- [CAT] = Categories
- [PR] = Priority
- [ST] = Status
Outlook recognizes that people probably don’t want to see all these columns in any view. Instead, they have created various task views that focus on time, priorities, or status. And as we’ll see, you can customize these views further. In the example below, I’m using tasks related to this website, but you might customize for some productivity methodologies like GTD.
TextExpander: Worth It? Find Out.
Is TextExpander the right tool to boost your productivity? Get an independent assessment, weigh the pros and cons, and make an informed decision. Find out why I’m a fan.
Read the ReviewThe Standard Views
Any of the standard views below can be accessed from the Current View group. You’ll note that all these task views create a list with various columns. They do not include graphical-type views such as Kanban, where you can drag and drop each task like a card.
- Detailed List – all tasks and [CB], [PR], [AC], [DD], [MD], [DC], [IF], [CAT]
- Simple List – all tasks with [CB], [DD]
- To-Do List – split-pane view with open task details on right-side, grouped by the due date
- Prioritized – all tasks by priority with Created Date, Categories, and Flag Status
- Active – all open tasks with Status, Due Date, %Complete, Categories & Flag Status
- Completed – completed tasks with Due Date, Date Completed, Categories, Flag Status
- Today – tasks with Due Date=< Today, Due Date, Categories, Flag Status
- Next 7 Days – All tasks that are due in 7 Days, [PR],[AC],[DD], [%C], [CAT]
- Overdue – tasks with Due Date before today, [PR],[AC],[%C],[CAT]
- Assigned – All tasks assigned to me as OWner, [DD], [ST]
Define Your Task View
The first step is to define what you want to see in your task view that is different from one of the standard views. Below is the Detailed task view of 39 web maintenance issues. In its present state, there is too much information for me.

For my needs, I can remove a number of columns:
- Icon
- Attachment
- Modified
- In Folder
- Date Completed
- Flag Status (mail items)
In a similar fashion, I don’t want to see all 39 tasks. I prefer to see:
- tasks within the next 4 days (including overdue)
- no low priority items
At this stage, I’m thinking I want it sorted by Due Date and then by Priority.
Remove a Few Columns
You get an additional menu when you right-click with your mouse on a column header. I selected Remove This Column on the columns I didn’t want to see. This is great if you have just a couple of columns to remove.

Remove Multiple Columns & Change Order
If you have multiple columns to delete and wish to change column order, select View Settings… from the above menu. This will open the Advanced View Settings dialog. The title also indicates your current view after the colon. I’ll use this dialog for most of the task view customization.
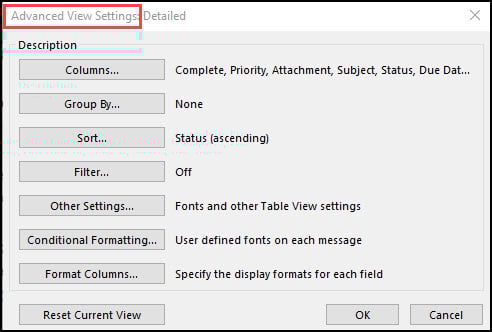
- Click the Columns… button. The Show Columns dialog opens with your existing columns on the right side.

- Hold down your Shift key and click each column you wish to remove. The items will turn blue.
- Click the <- Remove button in the middle.
- To change the column order, highlight your column and use the Move Up or Move Down buttons.
- Click OK.
- Click OK again to close the dialog.
I still have my 39 tasks at this stage, but just the columns I want.
Filter View by Criteria
Next, I want to filter my list so I don’t see all 39 items. I want a reasonable amount to focus on. In my case, I’d like to see tasks that are due this week but not low-priority tasks.
- Right-click any column header.
- From the menu, select View Settings...
- On the Advanced View Settings dialog, click the Filter button.
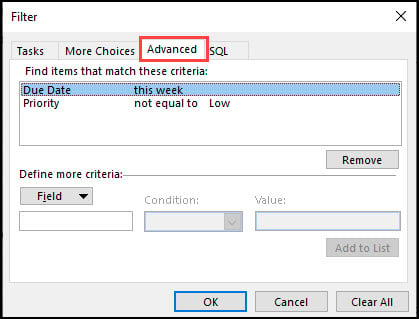
- Click the Advanced tab at the top.
- In the Define more criteria: section, click the Field drop-down menu and select Frequently Used Fields.
- From the side menu, select Priority.
- In the Condition: field, select not equal to and set a Value: of Low.
- Click the Add to List button.
- Repeat this process for Due Date.
- Click OK to accept filters.
- Click OK to close Advanced View Settings.
At this stage, my task list has gone from 39 to 6.
Add a Sort Order & Final Tweaks
Although I’ve reduced the number of tasks and columns, I would like to sort the view by Due Date and then Priority. The process is similar to filter, except we’ll click the Sort… button.

After adding my sort items, I have a custom task view that suits my needs. If you look at the Advanced Settings Dialog, you’ll see there are more customization options. You can also set things like fonts, groups, and spacing if you like.
Saving the New Task View
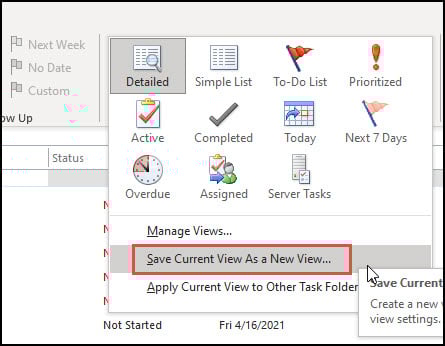
The final step is to save your new view. If you click the More control, which is to the far-right of the Current View group, another menu opens. From there, select Save Current View As a New View…
In the Copy View dialog, provide a new view name. In my example, I called it Web Focus, and it now has an icon in the Current View group.

Oops That didn’t Work
One safeguard that Microsoft added is that you can always reset the view back to the original values for default views. Highlight the default view in the Advanced View Settings dialog and click the Reset button. However, this option doesn’t apply to user-created views. Instead, you have the option to delete the view.
While I prefer customizing my task view, there are a couple of things you can’t do. I can’t add a specific view, such as the one I created, to Outlook’s Quick Access toolbar. It adds to the whole gallery. Additionally, it would be nice to assign a specific view to the Tasks link on the Navigation bar. Instead, it defaults to Today’s tasks when I hover over that link or icon.